Using JavaScript to Mask Inputs with Pega
The mask guides the user to type the correct value into the input field improving the user experience and mitigating errors on the client side. You will learn how to add JavaScript mask in your Pega application step by step.
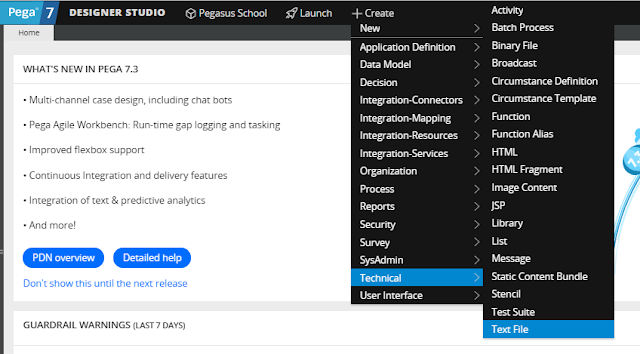
Create a Text File rule: Create >> Technical >> Text File.

Normally for the ID of the rule, we use PascalCase as project's standard but as it's used as a web file I suggest the use of web standards with underscores or hyphens.
Copy and paste your code or import the JS file and check the syntax for possible errors if everything is okay save your file. Now that we have the Plug-In installed let's create the initialization file.
Create another Text File.
Copy and paste the code below or create your own code or customize as you wish.
Using Live UI open the harness of your portal (the first/main harness) add your scripts and save and refresh your portal to load the new scripts.

Now refresh the screen and try your mask and have fun!
Before using JavaScript mask
You should be aware before using any third party script that it may generate conflicts with internal scripts of Pega so be careful always while using these scripts. You should perform some tests with scenarios using action sets like 'OnChange + Post Value' to verify if the OOTB functionalities are working as expected with the masked field.Importing mask scripts to your Pega application
Download the JavaScript library of your chose to use in the application.
For this example, we're going to use the following library:
https://igorescobar.github.io/jQuery-Mask-Plugin/
For this example, we're going to use the following library:
https://igorescobar.github.io/jQuery-Mask-Plugin/
Note: Pega already has shipped with the product Jquery and JqueryUI so you don't need to install them.
Create a Text File rule: Create >> Technical >> Text File.

Copy and paste your code or import the JS file and check the syntax for possible errors if everything is okay save your file. Now that we have the Plug-In installed let's create the initialization file.
Create another Text File.
Copy and paste the code below or create your own code or customize as you wish.
$(document).ready(function(){
$('.mask-date input').mask('00/00/0000');
$('.mask-time input').mask('00:00:00');
$('.mask-phone_us input').mask('(000) 000-0000');
$('.mask-mixed input').mask('AAA 000-S0S');
$('.mask-cpf input').mask('000.000.000-00', {reverse: true});
$('.mask-cnpj input').mask('00.000.000/0000-00', {reverse: true});
$('.mask-money input').mask('000.000.000.000.000,00', {reverse: true});
$('.mask-money2 input').mask("#.##0,00", {reverse: true});
$('.mask-ip_address input').mask('099.099.099.099');
});
Note: Because of the HTML structure of Pega you must use the selector Input after the class name.
To use more masks and behaviors verify the website of the creator of the plugin.
Finally, using the mask!
Using Live UI open the harness of your portal (the first/main harness) add your scripts and save and refresh your portal to load the new scripts.

Go to the desired field and apply the mask.
Do not use dots or the selector 'Input' just the class as the image below.
Do not try to use with fields already with OOTB mask as Number Control.

Now refresh the screen and try your mask and have fun!


Such a really helpful article. terribly fascinating to scan this text. I would wish to thanks for the efforts you had created for putting this on ink awe-inspiring article.
ReplyDeleteThis does not work, at least in version 8
DeleteThis does not work, at least in version 8.x
ReplyDelete