Creating PDF from HTML with Pega
PDF is one of the most used formats for documents on the Web and often there are requirements to create PDFs. In this article, you will learn step by step how to create PDF from HTML, how to customize the PDF and how to solve the problem of page break for PDFs with a dynamic structure.

HTMLtoPDF vs eForm
Pega has two traditional ways to generate PDF: HTMLtoPDF and eForm.
eForm is the easiest way to generate PDF if you have a PDF template and you just need to map the properties and values to the template but you are limited by the template and cannot use dynamic contents like Repeat Layout, Repeat Grid, dynamic images and so on. In another hand With HTMLtoPDF you don't have too many limitations but you have to create the PDF section by section and customize the appearance as well and generating a great effort. The HTMLtoPDF is the most powerful way to generate PDF and we're going to talk about this one.
eForm is the easiest way to generate PDF if you have a PDF template and you just need to map the properties and values to the template but you are limited by the template and cannot use dynamic contents like Repeat Layout, Repeat Grid, dynamic images and so on. In another hand With HTMLtoPDF you don't have too many limitations but you have to create the PDF section by section and customize the appearance as well and generating a great effort. The HTMLtoPDF is the most powerful way to generate PDF and we're going to talk about this one.
HTMLtoPDF core
Pega uses a third-party solution to generate the PDF from HTML and if you need more advanced support you may access the website of this third-party: http://pd4ml.com/Creating PDF
Pega uses an activity called HTMLToPDF of the @baseclass class. Before starting with the creation of your activity you should understand the structure and requirements of your PDF. The initial creation of your PDF should be the Sections that shall be used as HTML stream.
PDF Header
The header may be used when we have a PDF with more than one page.
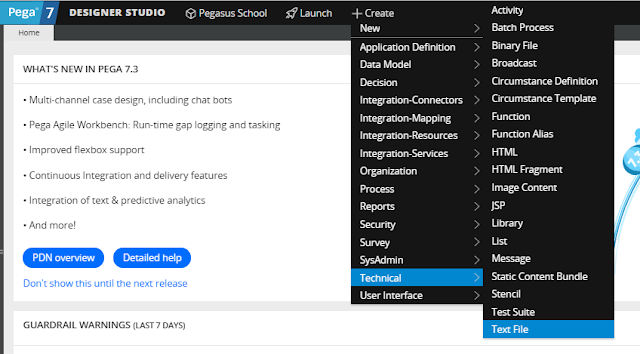
First, create a Section with a name like this one: HeaderPDF. The name and class is a personal choice and depends on your class structure but is recommended two use the words 'Header' and 'PDF' in the name of your Section to not confuse with other sections.Now, create an HTML: Create >> Technical >> HTML.
Select a name like this one or any other of your choice: "HtmlHeaderPDF".
In your HTML add the Section created for the Header using Pega include like the image below and save.
PDF Body
First, create a Section with a name like this one: BodyPDF.Now, Create an HTML: Create >> Technical >> HTML.
Select a name like this one or any other of your choice: "HtmlBodyPDF".
In your HTML add the Section created for the Body using Pega include like the image below and save.
PDF Footer
Now, Create an HTML: Create >> Technical >> HTML.Select a name like this one or any other of your choice: "HtmlFooterPDF".
You can customize your HTML as you wish and the reserved names $[page] and $[total] can be used to display the page count.
$[page]: Current page.
$[total]: Total number of pages.
Creating your Activity to generate the PDF
We're going to create the Activity with just basic steps to generate the PDF but your activity probably will have more steps to achieve some requirements.You may start your Activity setting the header HTML stream using the method Property-Set-HTML to prepare the params of the Activity HTMLtoPDF.
For the param PropertyName type: Param.pyPDFHeaderHTMLTemplate
For the param HTMLStream type: Your Header HTML.
Now include a step to the stream of the Body.
For the param PropertyName type: Param.Markup
For the param HTMLStream type: Your Body HTML.
Now include a step to the stream of the Footer.
For the param PropertyName type: Param.pyPDFFooterHTMLTemplate
For the param HTMLStream type: Your Footer HTML.
HTMLtoPDF configuration
The Activity HTMLtoPDF has a lot of params and the Stream's param was already populated by us, but still, have some parameters that you should use.
Create another step in your Activity with the method Property-Set. You may create this step at the beginning of your Activity but never after the invocation of the Activity HTMLtoPDF that we're going to add later.
Set the Param PDFName with your desired PDF name.
Set the Param pyPDFPageOrientation with the format that your PDF should have.
"Portrait" - For vertical format, Standard format used by PDFs.
"Landscape" - For Horizontal format,
You may set any other Param of the Activity HTMLtoPDF in this step.
Calling HTMLtoPDF
Create a step calling the Activity HTMLToPDF and make sure to check the checkbox 'Pass current parameter page' it means that everything we did until now we are passing as parameters to the Activity.The output of HTMLToPDF is the parameter 'PDFDocument' as a byte array and we're going to use it in the next step. With this byte array, we can use to download the PDF, encode to Base64 to send through a Service or attach to the Work Object.
After this step, the creation of the PDF is completed and saved in the Param 'PDFDocument'.
Downloading the PDF through the browser
If you want to download the PDF automatically after the creation you may add another step after the step that calls the HTMLtoPDF Activity.
You may use either a Java step using the OOTB Java method sendFile(); that Pega uses to download files or you can use the Activity 'View' of the class 'Code-Pega-PDF' that already have the sendFile();
To know more about sendFile(); please verify the following image:
You may use either a Java step using the OOTB Java method sendFile(); that Pega uses to download files or you can use the Activity 'View' of the class 'Code-Pega-PDF' that already have the sendFile();
To know more about sendFile(); please verify the following image:
After this step, your PDF is ready to download when you call your activity.
But you cannot send a file through AJAX so you can't use Refresh section calling your activity.
There are two basic ways to download the file:
1- Creating a JavaScript to append an HTML iFrame to download the file (This is the most stable solution).
2- Refreshing the Harness. (This is the easiest solution. For now, let's see only this one).
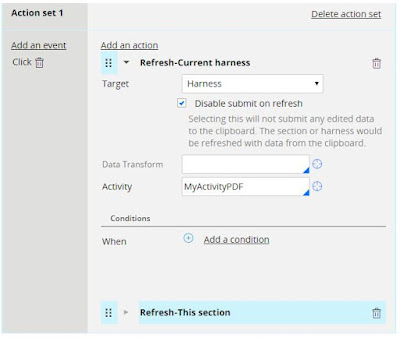
Create an action set with the action Refresh-Current harness calling your activity and check the checkbox Disable submit on refresh.
Add a Refresh-This section action to clear the loading screen after the download and it's done!
Well, that was the process to create and download PDF now let's see some tips & tricks that might help you customize your PDF.
Customizing your PDF
1 - Do not use Skin's CSS.
Your Skin probably has more than 1 million characters or more than 50 thousand lines. It generates a lot of effort to process the style to apply to the PDF and for sure you shall not be satisfied using only the CSS from the Skin due to the limitation of CSS and HTML tags that the PD4HML has.
The recommended way is to create your own specific CSS style to use. Create a Section with custom HTML and add your CSS classes as you wish and insert into the Sections of your PDF.
Make your PDF much simple as possible. You may use Free Form layout to create a table structure for your PDF instead of trying more complex solutions.The recommended way is to create your own specific CSS style to use. Create a Section with custom HTML and add your CSS classes as you wish and insert into the Sections of your PDF.
2 - Simplify your PDF
3 - Apply the Page Break
If you have a dynamic PDF your content may appear between two pages and I don't need to tell you that it's wrong.There are some ways to apply Page Break but using CSS is a very stable one.
Create a HTML Section with the code below and place above your dynamic content.
<div style="page-break-inside:avoid;">
Create an HTML Section with the code below and place after your dynamic content.
</div>
To see more page break options access: http://pd4ml.com/


Wonderful Post!!! Thanks for sharing this great blog with us.
ReplyDeletePega Training in Chennai
Pega Online Training